
Preview Environments on Kubernetes - Everything You Need to Know
A comprehensive guide to setting up preview environments on Kubernetes using Garden, GitHub Actions, and GKE. Test your pull requests in production-like environments before merging.
External Publication
Originally published by Garden.io. This is an archived copy.
Read original articleINFO
Originally Published: This article was originally published on March 30, 2023 at Garden.io Blog.
This is an archived copy to ensure it remains available. All content © Garden.io.
To ensure your product functions correctly, you need to conduct thorough tests. However, testing in a local development environment or a staging environment is vastly different from the production environment where the product will eventually live. Preview environments are a much better option for testing because you can have a realistic production-like environment at your fingertips. Testing in this type of environment increases the likelihood of identifying problems and bugs before the product goes live.
What is a preview environment?
A preview environment is a safe, temporary, fully functional instance of a live (or production) environment that can be created or destroyed as needed. It improves collaboration between development and operations teams and reduces the risk of introducing bugs or breaking changes to the production environment. This type of environment makes it easy to preview pull request (PR) changes in a real-world setting before merging. In addition, provisioning preview environments on demand removes the bottlenecks caused by manual provisioning.
An ideal preview environment should be lightweight, easy to manage, and should not require any complex setup. However, in practice, achieving the above with Kubernetes can be difficult. This is where Garden helps to make preview environments a breeze to set up and use.
In this article, you’ll learn how to integrate Garden with GitHub Actions, a continuous integration, continuous delivery (CI/CD) platform, to deploy preview environments on a Kubernetes cluster.
Using Garden to manage preview environments
As a modern, open source DevOps platform, Garden helps you build, deploy, and manage containerized applications running on a Kubernetes cluster. It provides a simple, intuitive, and efficient way for developers to manage their projects, regardless of the size or complexity of the application. It also integrates with popular tools and services, including Kubernetes, Docker, and Helm, making it easy to leverage your existing infrastructure.
With Garden, you can easily create and manage multiple preview environments for your different branches using infrastructure as code (IaC). To do so, you define your infrastructure using a YAML file. When you store this infrastructure code in a version control system, like Git, you can easily track changes, collaborate with other team members, and audit your environment to ensure security and regulatory requirements have been met.
The following diagram depicts how Garden deploys a preview environment on a Kubernetes cluster:
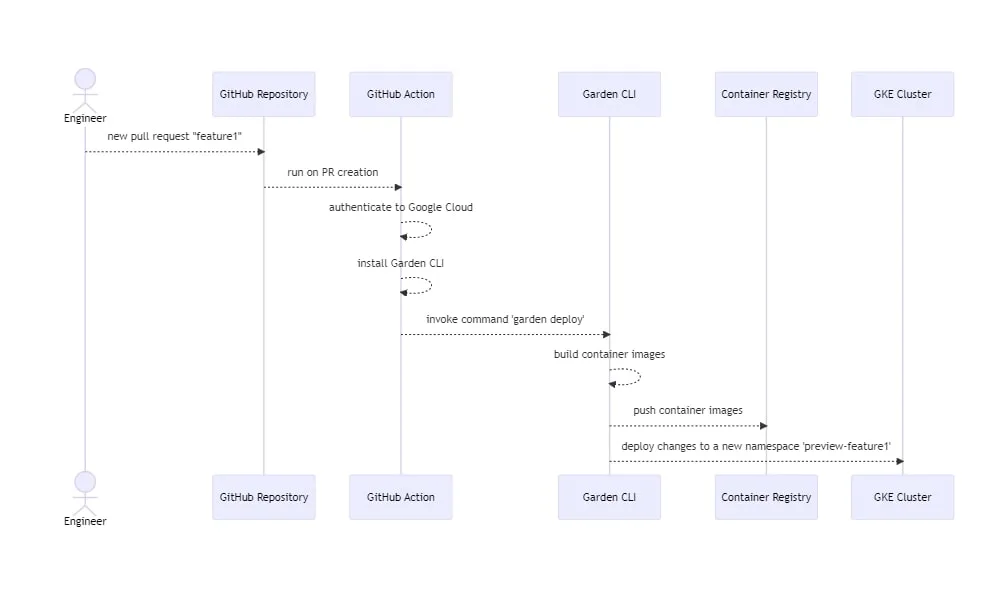
As you can see, the Garden CLI is installed on a GitHub agent that is running the workflow. Once a new pull request is created, GitHub Actions calls the Garden CLI command to provision a preview environment. In turn, Garden reads the environment details from a project config file (project.garden.yml), builds Docker containers, and pushes them into the container registry. Finally, it uses kubectl to communicate with the remote Kubernetes API server to deploy the resources as needed.
Implementing on-demand preview environments
In this tutorial, you’ll learn how to spin up a Kubernetes preview environment after creating a pull request in GitHub. Then you’ll set up a Garden project and create GitHub Actions that automatically provision the preview environment when there is a push to the branch with a PR on it.
Before you begin, you’ll need the following:
- Git installed on your OS.
- A GitHub account.
- A Google Kubernetes Engine (GKE) cluster. You’ll deploy a demo application to this cluster.
- Garden installed on your OS.
- For simplicity, this tutorial is based on this Garden tutorial that uses GKE.
Create a demo project
To begin, you need to clone the demo project and navigate to its base directory:
git clone https://github.com/garden-io/garden.git
cd garden/examples/demo-project
Make sure you have a single-zone Kubernetes cluster provisioned and ready to operate. You also need to install and configure kubectl to interact with your cluster and store the kubectl context in kubeconfig. For more information on how to do this, check out this documentation from Google.
In addition, you need to set up your container registry and enable in-cluster building with the Google Container Registry (GCR). If you need help with this step, this documentation from Garden is a great resource.
Lastly, you need to create a GKE service account so that GitHub Actions can deploy to GKE.
Please note: You need to give the service account the proper permissions. The example code for this article uses a service account named “sa-deploy” with the roles “Kubernetes Engine Developer” and “Storage Admin”. If you encounter any issues with this, you can read through this GitHub article to help troubleshoot.
Set up the Garden environment
After cloning your project, you need to update it and add a preview environment to your project config file.
Garden’s environments are a software deployment space where the source code will be deployed and executed. For the purpose of this tutorial, a preview environment will be deployed within a separate namespace in the same GKE cluster.
To define your preview environment configuration, navigate back to the demo project base directory and open the garden.yml file with the text editor of your choice.
Find the environments section:
environments:
- name: local
- name: remote
	defaultNamespace: ${var.userId}
The local environment can be used to deploy your work-in-progress code to a local Kubernetes cluster. However, for the purpose of this preview environment, replace the existing remote environment with the preview environment configuration. For full customization, refer to the official documentation. Otherwise, the following configuration can be used as a starting point:
kind: Project
name: demo-project-start
environments:
  - name: preview
    defaultNamespace: '${local.env.USER}-${local.env.PR_NUMBER}-preview'
providers:
  - name: kubernetes
	# replace the context with your kubectl context
	context: gke_preview-env-demo_europe-north1-a_demo-cluster
    environments:
      - preview
    namespace: '${environment.namespace}'
	deploymentRegistry:
	# set the hostname according to the region your cluster runs in
	hostname: eu.gcr.io
	# set the namespace to the project ID of the target cluster
	namespace: preview-env-demo
    imagePullSecrets:
      - name: gcr-config
        namespace: default
To simplify the setup, you can remove the ingress configuration from both the backend and frontend services. To do so, open the garden.yml file for each service and delete the ingresses section, as shown here:
ingresses:
  - path: /hello-frontend
	port: http
  - path: /call-backend
	port: http
At this point, you need to run a few Garden commands locally to verify that everything is working:
export USER="local"
export PR_NUMBER="pr1"
Then run the following commands to verify the setup is correct:
garden deploy
garden get status
The garden deploy command deploys an environment and builds any necessary modules and dependencies. The garden get status command outputs the full status of your environment.
Next, run the dev console and navigate to the Garden dashboard to view the setup:
garden dev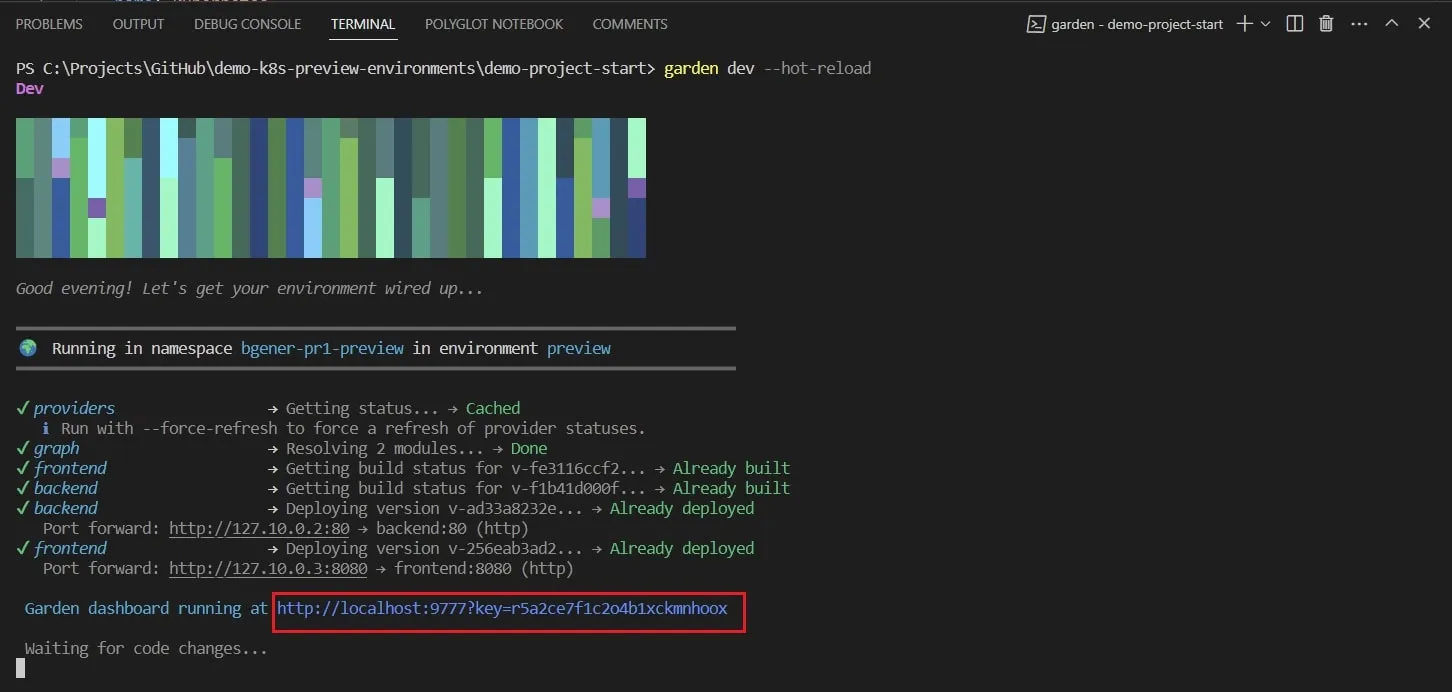
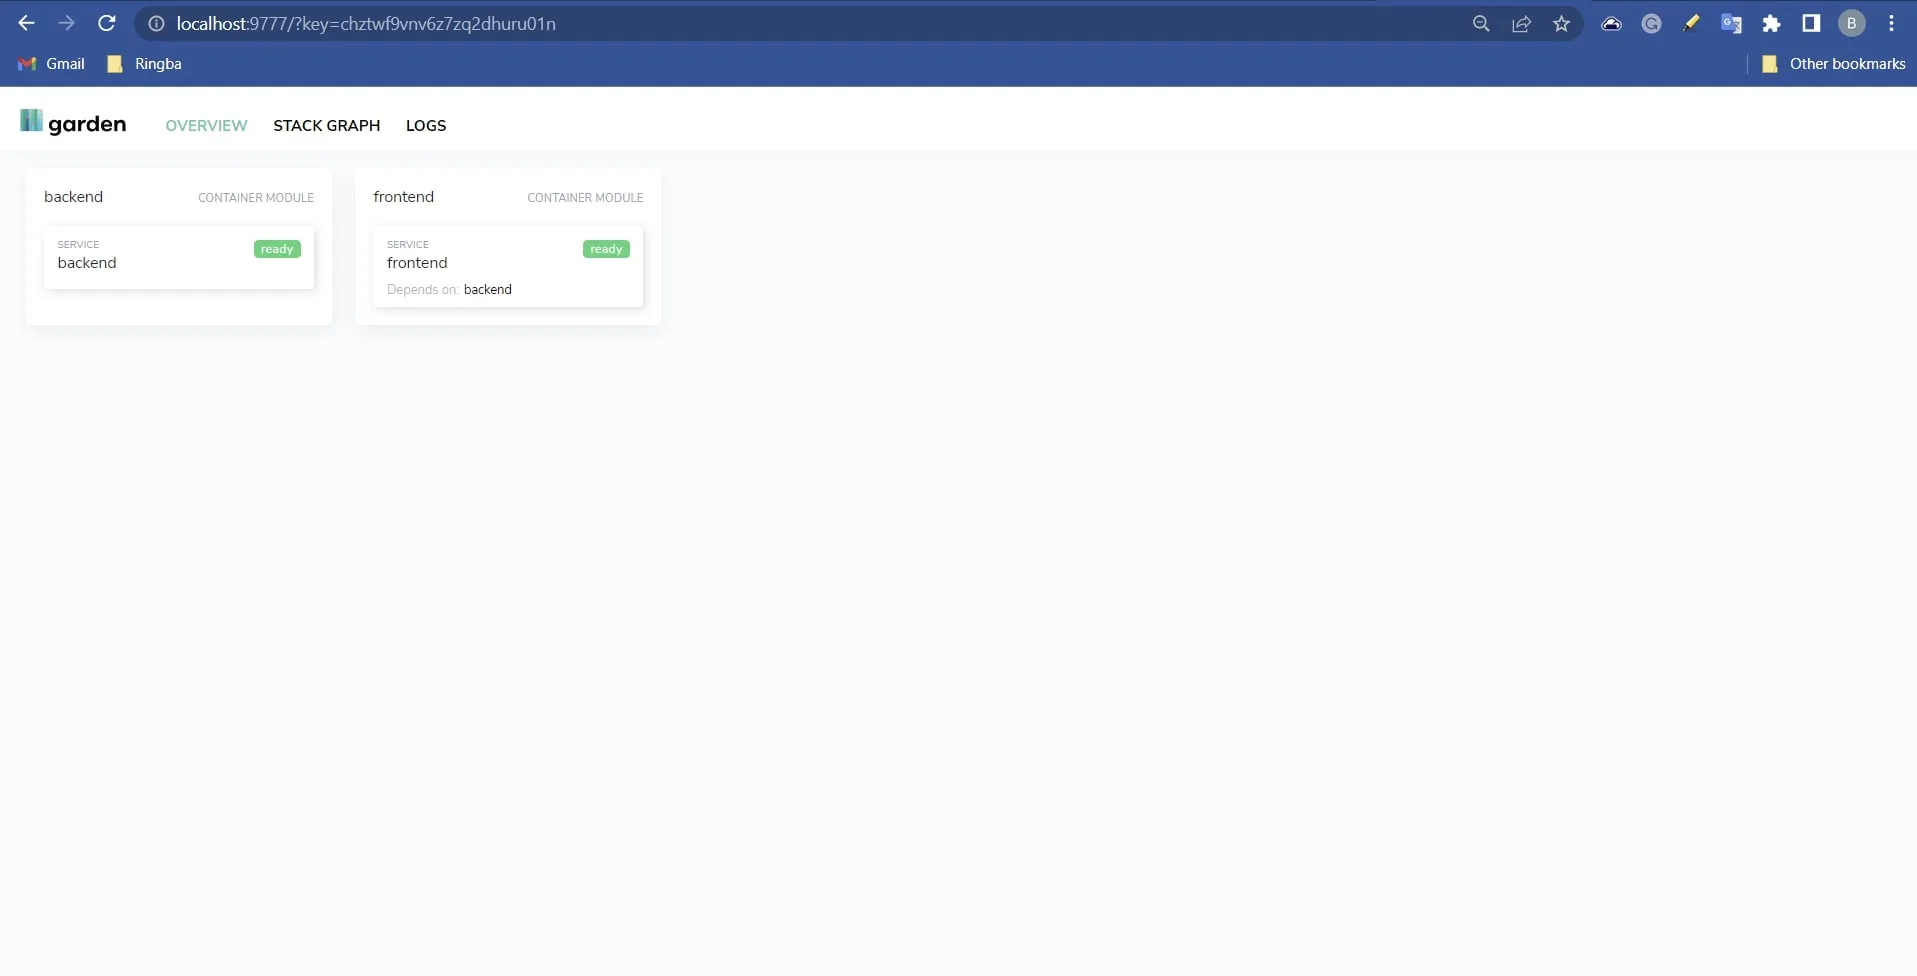
The dashboard should display the status of both the backend and frontend services as “Ready”:
Create a GitHub workflow
In this section, you’ll create a workflow file to run your GitHub Actions. Create a GitHub workflow file under the folder .github/workflows and name it pr-preview-env.yml.
 # Install Garden CLI tool
 - name: Set up Garden
   run: |-
     curl -sL https://get.garden.io/install.sh | bash
     export PATH=$PATH:$HOME/.garden/bin
     chmod u+x $HOME/.garden
     echo "PATH=$HOME/.garden/bin:$PATH" >> $GITHUB_ENV

 # Deploy the preview environment to the GKE cluster
 - name: Deploy
   if: github.event.pull_request.merged == false
   run: |-
     cd ./demo-project-start
     garden --version
     garden --env=preview plugins kubernetes cluster-init
     garden deploy
     garden get status

 # Destroy the preview environment once a pull request is merged
 - name: Destroy
   if: github.event.pull_request.merged == true
   run: |-
     cd ./demo-project-start
     garden delete environment --env=preview
Preview the changes
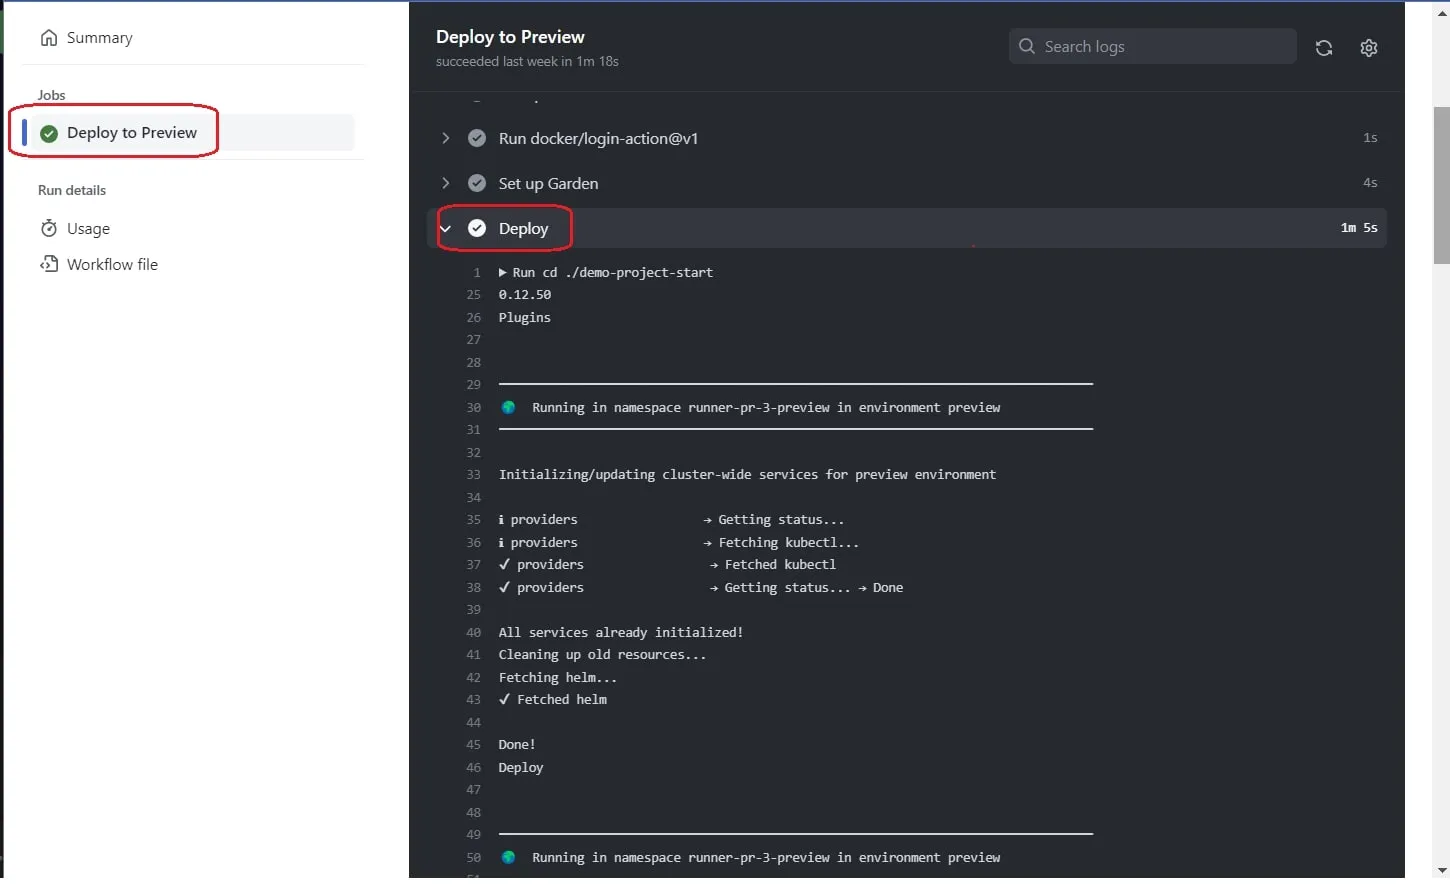
To see the workflow run, navigate to GitHub Actions and click on the job Deploy to Preview:
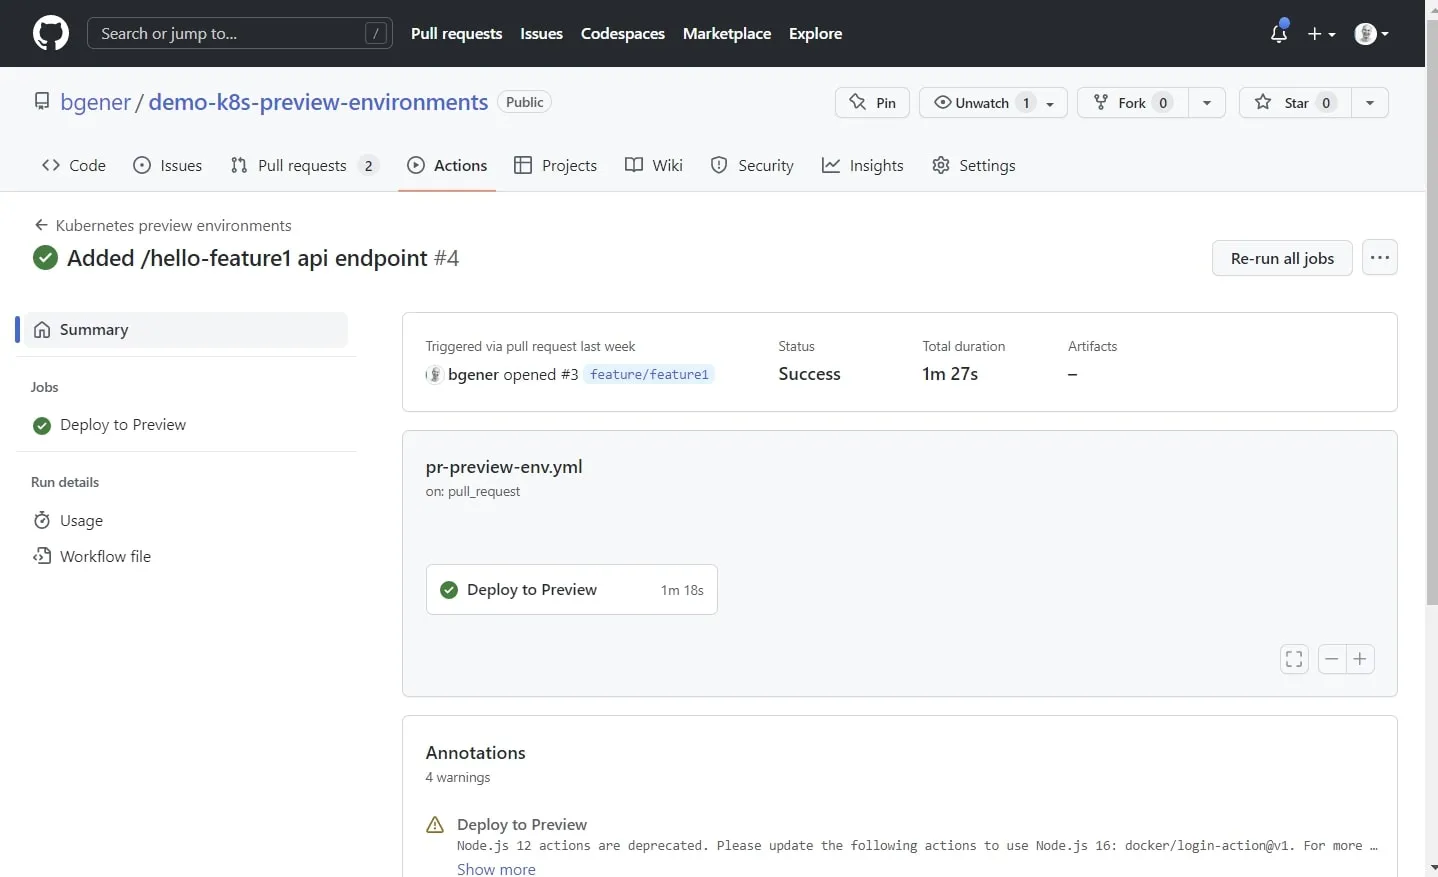
View the results of the Deploy step:
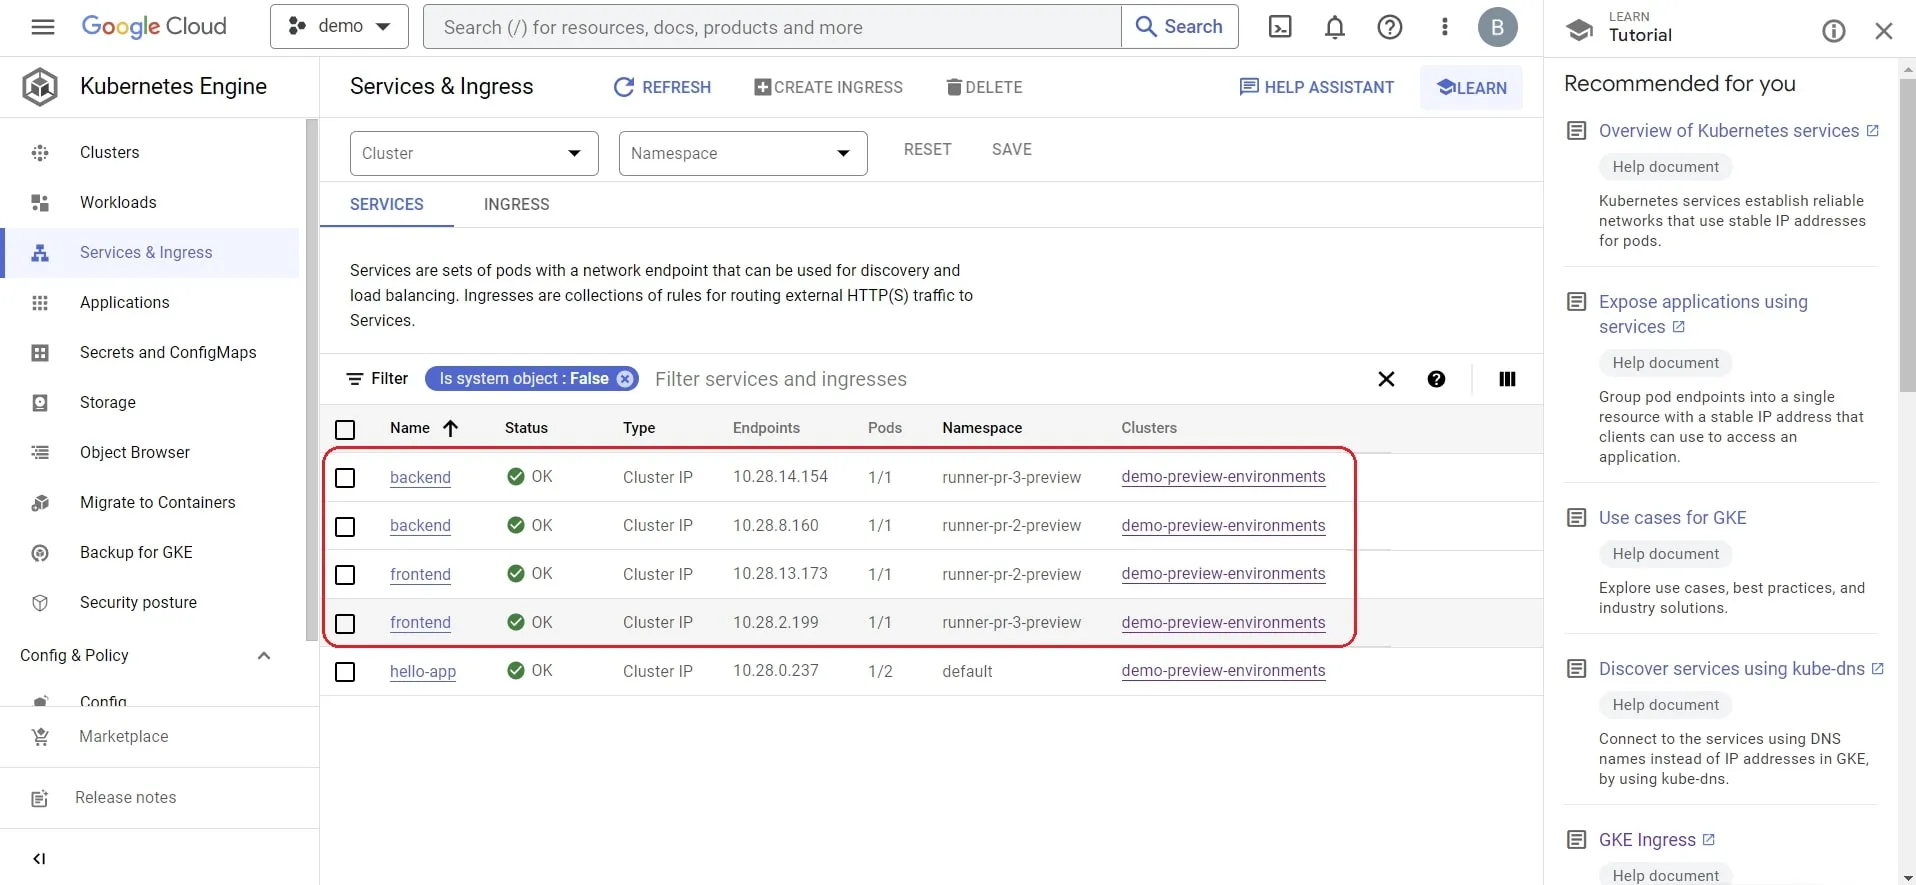
Next, navigate to your Kubernetes cluster and verify that there are services and pods running in the namespace runner-pr1-preview:
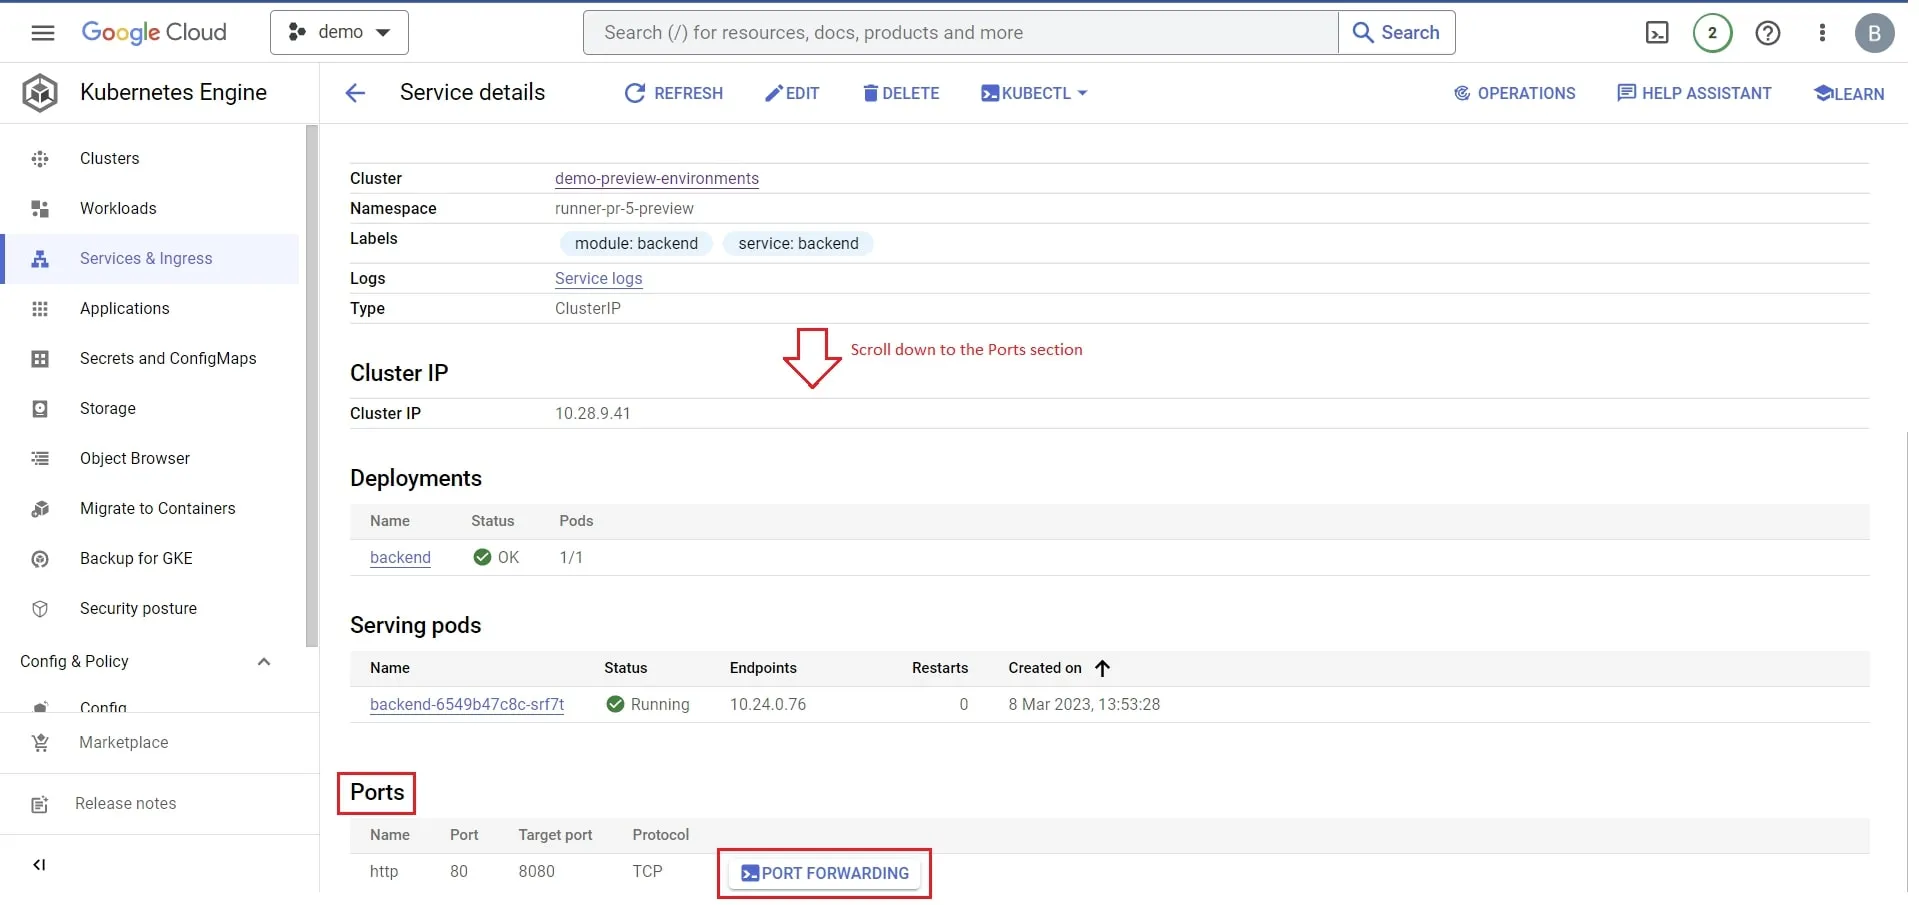
To set up port forwarding, select the service backend, scroll down to Ports, select PORT FORWARDING:
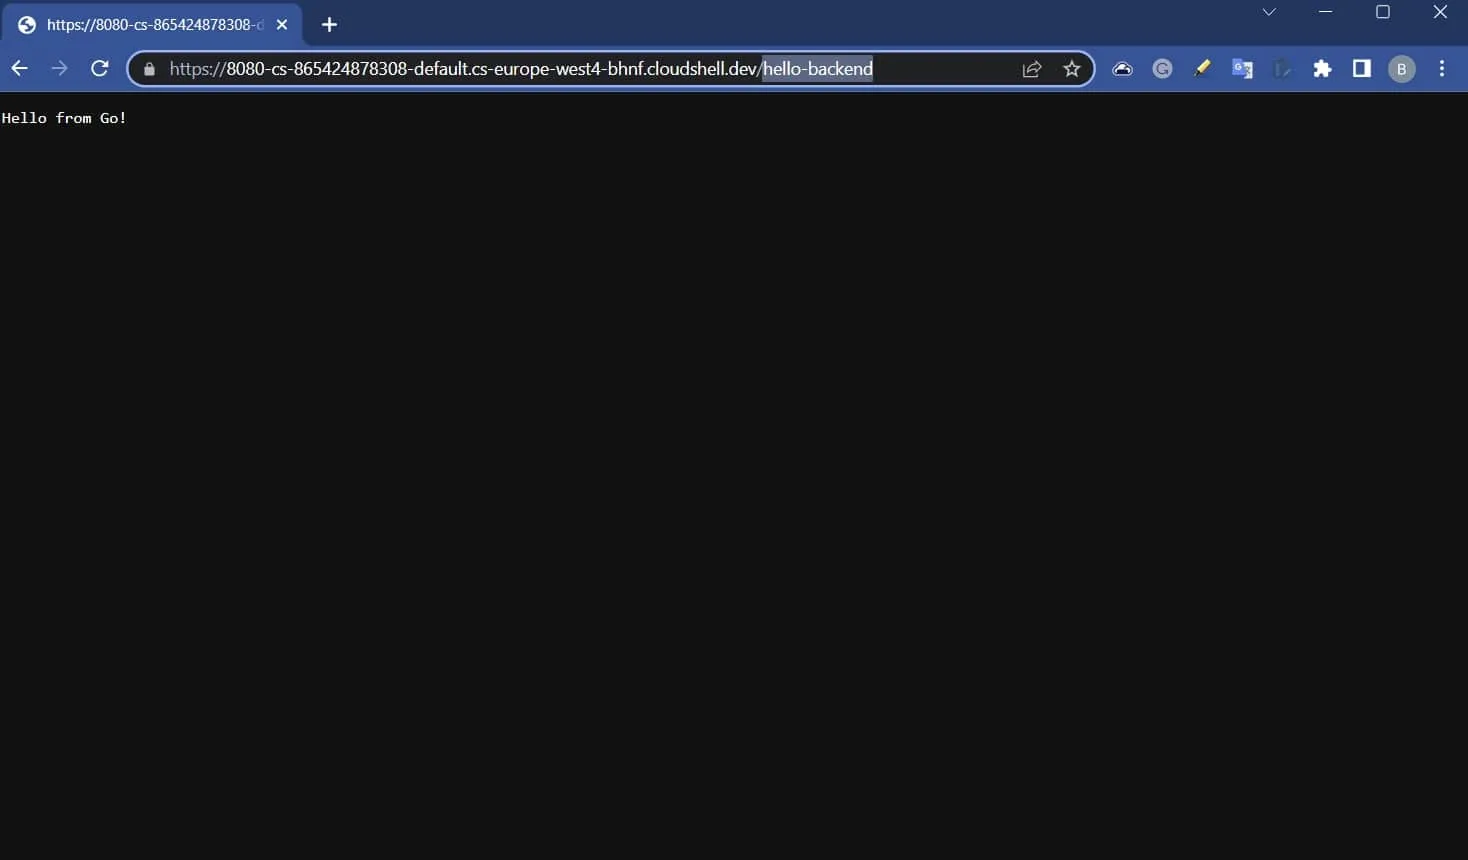
You should see the response message “Hello from Go!”:
Conclusion
Preview environments provide a safe, controlled environment for testing and help you get feedback quickly. Garden is designed to simplify the management and testing of cloud-native applications running on Kubernetes.